
This system has been updated to v2.0
I've just completed the filtering / dewatering station. It is based on erikk's set up he posted on the SVO forum. Many thanks to erikk and everyone who posted.
Basically the system is a 2 tank system with the oil initially settling in 35lb cubees for at least 2 weeks. The soy oil I receive is used once. After the settling period it is then poured through a 25 micron sock filter (soon to be changed to a 15). Once the first drum is full it is heated for a few days to dewater the oil and reduce it's viscocity for filtering to the next drum. While still warm (about 95- 100º)it is then pumped through a 10 micron Goldenrod and then through a 5 micron sock into the 2nd drum. Once the 2nd drum is full it is again heated for a few days to dewater again. Finally while being pumped into the car it goes through 2 micron Permacool filter.
I have a 3rd drum for settling that I keep for extra oil as someone delivered about 30 gallons to my house and it had a lot of emulsivied water in it.
Each drum has wrapped around it a 30' long, 60 watt pipe heater cable
BUILDING THE SYSTEM
After aquiring 2- 55 gallon drums I purchased 2 - 30' wrap on pipe heaters (pictured right). I live in Southern California where it is extremely rare for it to get below freezing so I had to purcahse them on the net from USAhardware.com. They come in different lengths and in hind site I think I would order the 45' cable because it would heat faster and probably be a little hotter.
What made me decide on this set up is the fact that since the heater is wrapped around the side of the barrel it is not centralized. With a centralized heating source there is a greater chance of convection currents (ie: water heater element). These currents stir the oil up while heating thereby not letting the microdropplets of water settle out.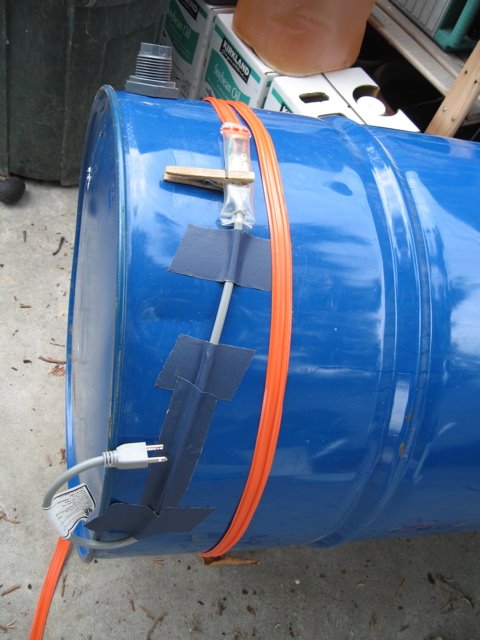 The other thing (and perhaps a water heater element is the same) is that it doesn't use that much engery. It is the equivilant to using a 60watt light bulb. Now granted it takes a day or so to heat it dependig on the ambient tempature but still that doesn't seem like much. The whole idea for me is to use the minumum amount of energy that is required. Plus the pipe heater is so much cheaper then the 55 gallon drum heaters. Beaware though that you are not using this heater for what it was intended for. Use at your own risk.
Before installing heater band I installed a bulkhead pipe fitting into each steel drum. I figured that this might be an easy way to drain it when the time comes. The consensus is that the muck that forms on the bottom of the drum somehow acts like a magnet for microdroplets of water and attracts them to it once it builds up. So draining the drum is something I would only do rarely as to maintain a layer of muck(emulsivide water) at the bottom.
You will have to override the thermastat on the pipe heater cables as they were only designed to come on at freezing. In the photos you can see a clothes pin. It was used to activate the test button thereby overriding the thermastat. The brand of heater I have has a light that come on when the heater is activated.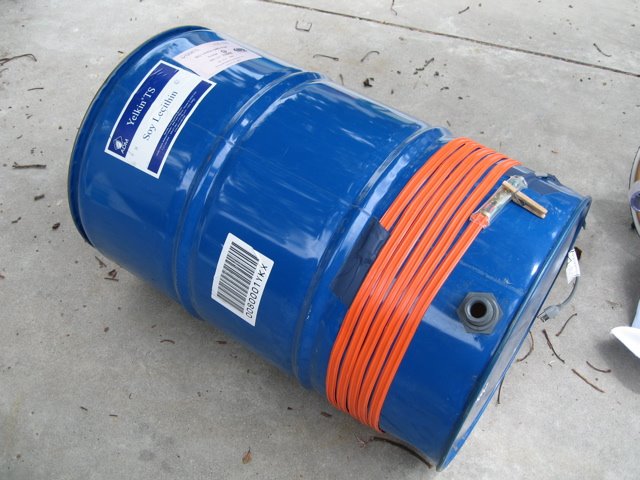 The pipe heaters - one on each drum - were wrapped around the drums starting at about 6-7 inches off the bottom. Be careful as not to overlap the cable ontop of itself as this will cause it to get too hot and possibly overheat.
In the end I ended up doing it a little differently then what is pictured at right. I had to go back & move the heater cable so that I could reach an electrical outlet. After rereading the forum thread some people suggested spreading the cable out, so that is what I did. It still goes from about 7" from the bottom but goes up to about the 2nd ridge. That is what made me think a 45' cable might be better, but actually the 30' seems to be good so far as the oil was over 100ºf
After the pipe heater was installed the drums were wrapped in R-13 insulation. This prevents convection currents and is obviously the only way to retain the heat when cold outside. Before the drums were insulated I tried the heater and wasn't even sure it was working but when I tried it wih the insulation is was extremely hot. Someone on the forum said they built a box around there drums and filled it with styrofoam peanuts as an insulator. I would have preferred to do mine that way but I was aready down this road.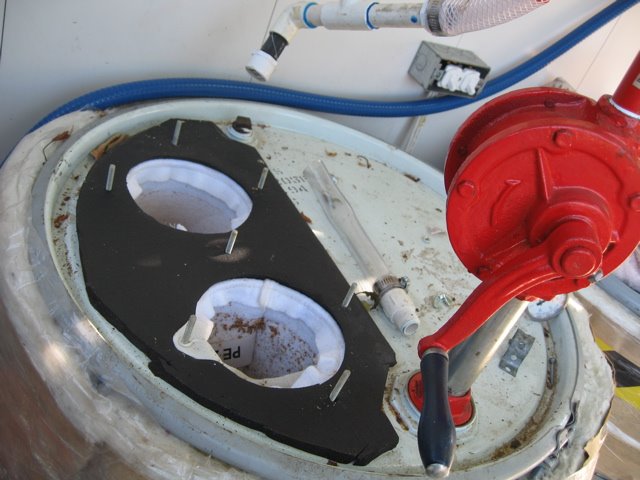
So both drums have the electric pipe heater, are wrapped in insulation and also wrapped in clear pallet wrap (kinda like syrane wrap) . The first drum's lid has 2 - 5" x 17" 25 micron socks hanging from it. I went with the 17" length because the 22" are very close to the 6" barrier above the bottom of the tank and I thought why disturb it if I don't have to. As for the 5" diameter I thought who needs a 7". In hindsight the 7" is better because the cubees are easier to pour into a 7" opening and less messy as I spill / splash some because of the 5" opening. I plan on changing the 25 micron to a 15 micron because my oil is only used once so I think a 15 would be OK and extend the life of the Goldenrod.
The plan is to wait until the 1st drum is full and move it's contents 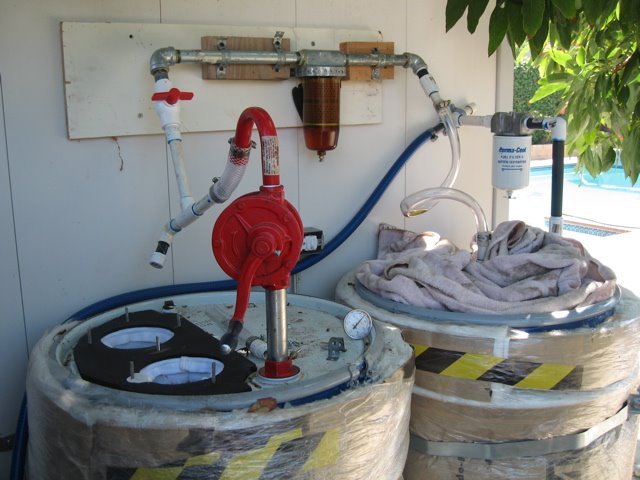 to the 2nd drum. This way I'm only heating the oil in the first tank once. So a day or 3 before I wish to transfer the contents from the 1 st tank I turn on the heater. This promotes dewatering and reduces the viscocity. The Harbor Freight pump is used to push the warm oil through a 10 micron GoldenRod filter which goes down through a clear piece of tubing (easier to work with and I can see the clarity of the oil) into a 5 micron sock. From there I just need to heat it for a few days to dewater it
The final stage is a 2 micron PermaCool filter that the oil passes through on it's way to my car via way of a Northern Tool 12v diesel pump. I try and fill up the tank while the oil is still warm in the 2nd tank as not to tax the pump more then I have too. I plan on heating the oil for a day or so before each fill up to warm it during the winter months.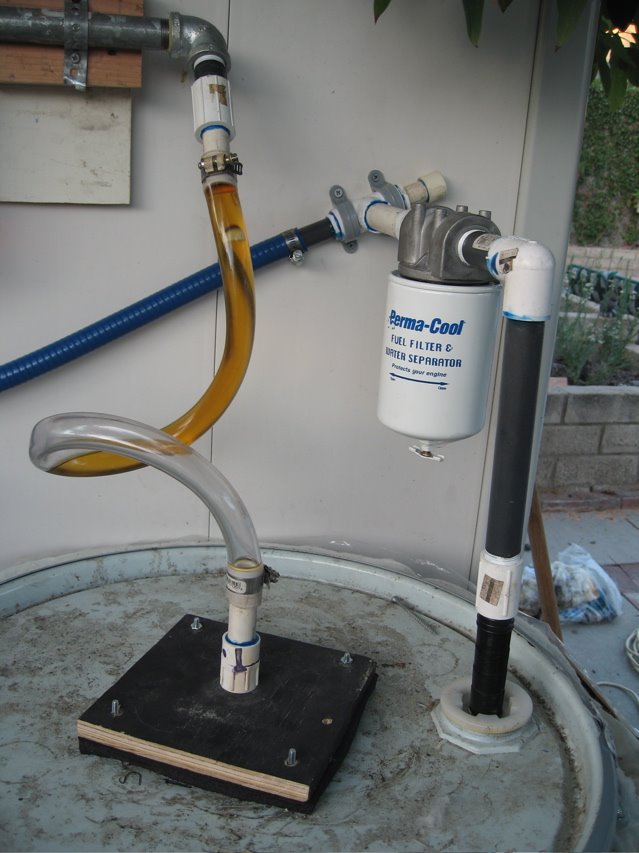
BUDGET
- 2 - 30' pipe heater $75
- 2 - 55 gallon drums $20 each
- Harbor freight hand pump - $40
- Northern tool pump - $150
- Golden rod $3o
- Permacool filter - $50
- Insulation - $15
- Earthquake Straps - $20
- Misc pipes / tubing / PVC - $30
VIDEO:


nice set up but how long do those filters last?? Thanks
ReplyDeletedid you cut the top off the barrels in order to install the bulkhead fittings? and, if so, did you use an actual drum deheader? am just setting up my first filtration/storage system, and am basing it off of yours. thanks for your help.
ReplyDeleteBrady,
ReplyDeleteI don't do that much volume of oil so they tend to get moldy before they are done as filtering agents.
Matt,
The drums have lids. so that is not an issue. I had a previous plastic barrel with an attached lid but got rid of it for that reason
Great set up, I was wondering how many gallons of fuel are you able to filter before changing your perma cool and goldrod filters
ReplyDeleteRichard
hey, nice set up.
ReplyDeleteI'm in the process of setting up my filtering system, and have the same hand pump and sock filter you've got.
I was wondering about your seal on the sock filter, and the rate you can hand pump through the sock.
I was thinking to rely on Gravity to drain the sock, or maybe like this:
http://tinyurl.com/yqlbyf
but it seems you've got a better set-up than that.
I haven't been able to find gaskets for the 7" filters I've got.
Any tricks on sealing those filters? any experience on the flow rate using the hand pump?
I really appreciate you posting these details. I got much more out of this than some plans I purchased for $25. Here is a link to my new rig:
ReplyDeletehttp://www.burnveg.com/forum/viewtopic.php?t=103
I made some changes - the most noteworthy are the prefilter apparatus and collapsing everything to a single barrel. Thanks again for making this possible.
If you guys are ever in the need to transport this filtering system, consider this versacart.
ReplyDeletehttp://www.versacart.us
Aaron,
ReplyDeleteI think the gasket you are speaking of was something I added from some scrap foam I had lying around. I had purchased some neoprene scraps from a fom store for another project and used these pieces in the system. As for the flowrate, I think it depends on how dirty the oil is. Heating it will certainly let it flow faster. I never had to wait too long for the oil to drain from the sock once it was heated.
HELLO,
ReplyDeleteI GOT A FEW QUESTIONS AFTER READING YOUR ENTIRE HOME FUEL SETUP DESCRIPTION.
WHERE DO YOU BUY THESE FILTER "SOCK"? AND HOW MANY GALLONS (APROX) DO THEY LAST? OR CAN YOU WASH THEM OUT?
ARE THERE BAD AND GOOD BRANDS TO BUY? HOW MUCH DO THEY COST?
HOW MANY GALLONS (APROX) DO THE 2 MICRON FILTERS FROM THE PERMACOOL LAST? HOW MUCH ARE REPLACEMENT FILTERS? (ONLY FOUND THE WHOLE KIT AT THE LINK YOU PROVIDED)
HOW MANY GALLONS (APROX) DO THE 10 MICRON FILTERS FROM THE GOLDENROD LAST? HOW MUCH ARE REPLACEMENT FILTERS? (ALSO ONLY FOUND THE WHOLE KIT AT THE LINK YOU PROVIDED)
WHY DO YOU USE A HAND BARREL PUMP IN DE 1ST BARREL EN AN ELECTRIC ONE FOR THE 2ND ONE?
AT HARBORFREIGHT THEY HAVE 4 HAND BARREL PUMPS. 2 LOOK LIKE YOURS AND COST ONLY $19.95 IS THAT THE SAME ONE? (YOUR IS $40)
AND WHERE CAN YOU BUY THESE 55 GALLON BARRELS FOR $20?
THANX SO MUCH,
PIETER
(FLYINGDUTCHMENN@AOL.COM)
This comment has been removed by a blog administrator.
ReplyDeleteDoes anyone have access to the one tank system described by a former poster? When I've tried to access the link it doesn't have the pictures so it is difficult to follow the text. http://www.burnveg.com/forum/viewtopic.php?t=103
ReplyDelete