I thought I would mention the particular oil that I use in my Plantdrive kit. The Plantdrive kit requires liquid oil. That is to say no Crisco or hydrogenated oils - it must be flowing at room temperature or colder. It can not be grease, part of the reason is their approach to tank heating and the Vormax would clog if oil congealed in it, as the filter and bowl take a while to heat up. They make this very clear in their sales material.
Currently I am catered at work and I should have this job for another year or so. After that it may change because I am freelance and go from job to job. Some jobs last a day others several years.
The caterer saves the oil for me. Because we are mobile they work out of one of those "roach coach" trucks. They don't store the oil on site, they either give it to the commissary or take it back to they're main kitchen for disposal using the cubees it came in. They don't use large quantities of oil every day but we have fries, Chinese, tempura, and other various items that are fried once or so a week. I would say I average 4-5 gallons a week. They fry the food and they're done with the oil. Currently this is plenty because I live close to work and the Jetta SIPS fuel.
It is non hydrogenated soy* and used once. He sets it aside to let it cool then at the end of my shift I come buy and pour it back into a cubee using a homemade funnel from the Greasecar forum with a paint strainer installed. Evidently soy oil is not the best oil to use because of it's particular makeup. It's more susceptible to polymerization.
Contrary to popular approach, I did not secure a source of oil before starting the conversion. Besides being confused about the whole filtering process I was concerned about "taking over" the oil removal from a source. I didn't want the responsibility nor did I think I would need that much, again this car gets mid 30's MPG. My idea was to do the conversion, get the car working, and in the meantime purchase some new soy oil from Costco. I figured getting a source of oil would be the least of my concerns I also was fairly sure I could get the oil from work (I work seasonally and was not working when I converted the car).
*I have to watch as the have snuck in a couple of "creamy" - READ: partially hydrogenated cubees of soy which I have inadvertently mixed in with the good soy
Monday, November 20, 2006
The Oil I use (currently)
Saturday, November 18, 2006
Water leak solved - I think
129,900
About a month later it came on again, I thought that was strange. I filled it up and about 2 weeks later it came on again. At this point, I was hoping that since I had previously filled the reservoir when the engine was hot that the coolant receded and this caused the low reading. This wasn't to be as in another 2 weeks the light came on again and the fliud was low.
 There were no puddles on the floor so I was a t a loss for where the fluid was going. The motor oil wasn't whitish, as some folks had told me this was an indication of a blown head gasket - water in the engine oil. I thought that was unlikely as I didn't mess with any of that stuff during the install.
I had seen some red "crusty crystals" on the hose that connects to the heater core that I had "tee"ed into for the coolant supply. I decided to look at that while engine was still hot. Sure enough their was a small about of liquid at the rim of the hose. I think what happens is that if the engine gets hot enough the water leaks from this location as vapor. That would explain why there are no puddles and no visible leaks and why the gap between refills is so long.
I think what happened during the install was that I used a razor blade to remove the OEM hose from the one inlet. After I removed it I noticed a few grooves I had cut into the plastic inadverantly with the razor blade trying to cut off the hose. I only did this to one hose. The other issue is that the replacement hose I used was 3/4" - not an exact match to the metric hose that was previously on the bib. Perhaps these crusties formed because of the slits and slight oversize of the new hose in the bib and created the leak.
At the time of the install I could have cut the OEM hose but decided that new hose would be easier to work with.
I tightened the hose clamp that had the water leak a little more - it wasn't what I would call loose. I've done acouple long drives - over 30 miles each way and have not seen a drop in fluid level. It's been about 3 weeks. Hopefully this is the source and the leak is fixed.
Wednesday, October 11, 2006
Stall on Veggie
Wednesday Oct 11th
While I was sitting in the left turn lane onto Ventura Blvd. I heard what sounded like the engine pulsing. I looked at the tach and could see the RPM's dropping slightly then going to back up to the normal idle (about 820 RPM). I thought that was strange and swicthed back to diesel.
I drove about 3 more blocks to my destination and went inside for about 10minutes. I came out and decided to take ventura blvd. back to work and swicthed to oil. I drove about 2 miles and while sitting in traffic the car shut off without warning. I tried to restart but to no avail.. I was lucky as I was able to push the car directly into a parking lot .
I put it back on diesel and popped the hood. I briefly checked the new 3/8" brass tee I installed over the weekend but didn't see any leaks. The tee is on the return portion of the IP and is for a new temp gauge. The car has been fine up to today, Wednesday. I worked on it Sunday
I tried to start it (and get the oil out of the lines in case the engine cooled). I cranked it several times for 20-30's. As I cranked it it sounded like it was getting easier for the starter to turn until it finally started. I moderately reved it a couple times and returned to work on diesel - about a 1/2 mile with out incidence.
I didn't swicth to veggie for a couple days until I could look for an air leak. This was strange because of the way it just shut off. It's never done anything like it. Total fuel starvation while on Veggie. I emailed Craig at Plantdrive and he said chances are that it was an air leak, especially since I just openned the system. The only thing I could find as a possible cause was one of the hoses on the temperature tee had a 1/8" gap at the end and the clamp was a slightly smaller and not as tight as it should have been. One other thing was that I didn't pipe seal the temp sender in the adapter as per the directions for the temp gauge. The only other thing I can think of in terms of an air leak are the threads on the new temp tee. I sealed them as I have in the past so I didn't mess with them as I want to deduce a cause by elimination.
Friday Oct 13th
After replacing the hose clamp with a better one and eliminating the 1/8" gap by sliding the hose all the way onto the hose barb I swich to veggie after returning home from work. The car seems to run fine while idling in my garage.
Saturday Oct 14th

I take it out for a run and do some errands. I decide to go to veggie a few blocks from the house. After a minute or 2 the car stalls. I get it restarted on Diesel and head home. Looks like I now have plans for my Saturday.
Since I've more or less checked & rechecked all the hose clamps & fittings I figure perhaps it's a clogged filter. I figure I'll disconnect the line after the vegtherm and hook up my hand bulb pump to see if I can get Veggie to flow freely so I know it is reaching the IP. (sorry forgot to take a pix) I throw the switch on the Pollak to veggie & pump. I hear what sounds a like a sucking sound from underneath the car by the fuel tank. I look and see a fresh pool of veggie oil on the garage floor. I'm imediately relieved to find the source of the problem. I don't know what it is yet but it's not a loose connection.
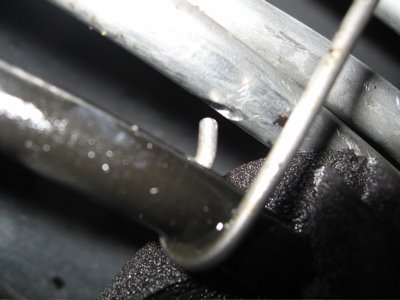 I look closer and realize it's coming from the aluminum veggie line. I feel around and find that a support hook for the brake line has punctured veggie line. The weight of the three lines resting against the tip of the hook over the last 3 months caused it to wear through the tubing.
In the picture, above right, are the 2 coolant lines on top with the veggie on the bottom resting on the point of the hook The one in the hook is the brake line wrapped insulation to protect it from the heat of the system. The 2 rubber ones are the diesel supply & return. Left, is a close up of the puncture.
 Since it's a small hole, in the middle of the line, and I don't have a flaring tool to repair it, I decide to patch it with a piece of rubber tubing & hose clamp. After the repair, I took it out for a drive today and it didn't stall on veggie or appear to be leaking. I'll keep checking it over the next few days/weeks. . . . .
I dewater my oil, filter to 2 microns, and only use liquid oil. If it was a clogged filter I would have lost faith in the system. The conversion is a pretty simple concept the problem is I keep interfering with it to experiment and improve my set up.
Friday, August 18, 2006
WVO filtering station complete

This system has been updated to v2.0
I've just completed the filtering / dewatering station. It is based on erikk's set up he posted on the SVO forum. Many thanks to erikk and everyone who posted.
Basically the system is a 2 tank system with the oil initially settling in 35lb cubees for at least 2 weeks. The soy oil I receive is used once. After the settling period it is then poured through a 25 micron sock filter (soon to be changed to a 15). Once the first drum is full it is heated for a few days to dewater the oil and reduce it's viscocity for filtering to the next drum. While still warm (about 95- 100º)it is then pumped through a 10 micron Goldenrod and then through a 5 micron sock into the 2nd drum. Once the 2nd drum is full it is again heated for a few days to dewater again. Finally while being pumped into the car it goes through 2 micron Permacool filter.
I have a 3rd drum for settling that I keep for extra oil as someone delivered about 30 gallons to my house and it had a lot of emulsivied water in it.
Each drum has wrapped around it a 30' long, 60 watt pipe heater cable
BUILDING THE SYSTEM
After aquiring 2- 55 gallon drums I purchased 2 - 30' wrap on pipe heaters (pictured right). I live in Southern California where it is extremely rare for it to get below freezing so I had to purcahse them on the net from USAhardware.com. They come in different lengths and in hind site I think I would order the 45' cable because it would heat faster and probably be a little hotter.
What made me decide on this set up is the fact that since the heater is wrapped around the side of the barrel it is not centralized. With a centralized heating source there is a greater chance of convection currents (ie: water heater element). These currents stir the oil up while heating thereby not letting the microdropplets of water settle out.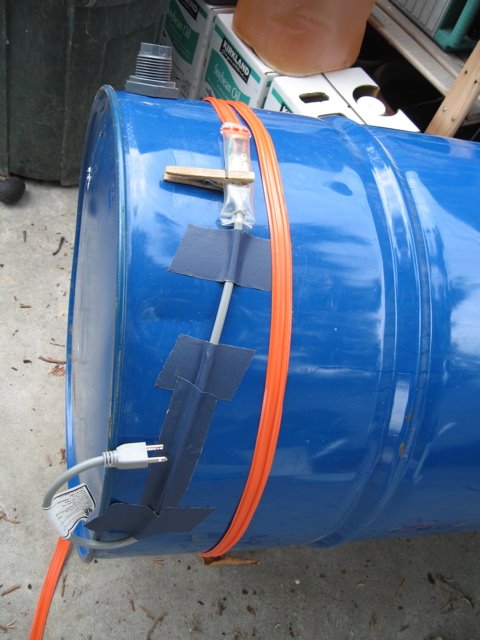 The other thing (and perhaps a water heater element is the same) is that it doesn't use that much engery. It is the equivilant to using a 60watt light bulb. Now granted it takes a day or so to heat it dependig on the ambient tempature but still that doesn't seem like much. The whole idea for me is to use the minumum amount of energy that is required. Plus the pipe heater is so much cheaper then the 55 gallon drum heaters. Beaware though that you are not using this heater for what it was intended for. Use at your own risk.
Before installing heater band I installed a bulkhead pipe fitting into each steel drum. I figured that this might be an easy way to drain it when the time comes. The consensus is that the muck that forms on the bottom of the drum somehow acts like a magnet for microdroplets of water and attracts them to it once it builds up. So draining the drum is something I would only do rarely as to maintain a layer of muck(emulsivide water) at the bottom.
You will have to override the thermastat on the pipe heater cables as they were only designed to come on at freezing. In the photos you can see a clothes pin. It was used to activate the test button thereby overriding the thermastat. The brand of heater I have has a light that come on when the heater is activated.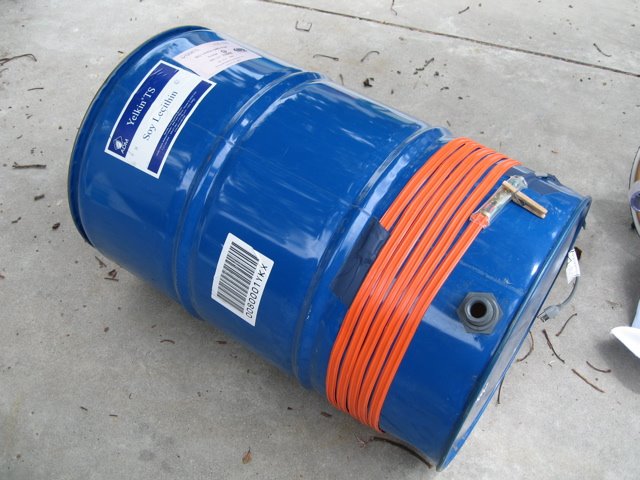 The pipe heaters - one on each drum - were wrapped around the drums starting at about 6-7 inches off the bottom. Be careful as not to overlap the cable ontop of itself as this will cause it to get too hot and possibly overheat.
In the end I ended up doing it a little differently then what is pictured at right. I had to go back & move the heater cable so that I could reach an electrical outlet. After rereading the forum thread some people suggested spreading the cable out, so that is what I did. It still goes from about 7" from the bottom but goes up to about the 2nd ridge. That is what made me think a 45' cable might be better, but actually the 30' seems to be good so far as the oil was over 100ºf
After the pipe heater was installed the drums were wrapped in R-13 insulation. This prevents convection currents and is obviously the only way to retain the heat when cold outside. Before the drums were insulated I tried the heater and wasn't even sure it was working but when I tried it wih the insulation is was extremely hot. Someone on the forum said they built a box around there drums and filled it with styrofoam peanuts as an insulator. I would have preferred to do mine that way but I was aready down this road.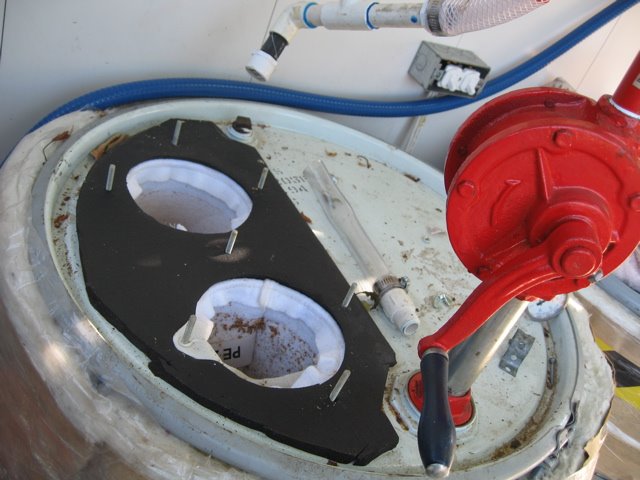
So both drums have the electric pipe heater, are wrapped in insulation and also wrapped in clear pallet wrap (kinda like syrane wrap) . The first drum's lid has 2 - 5" x 17" 25 micron socks hanging from it. I went with the 17" length because the 22" are very close to the 6" barrier above the bottom of the tank and I thought why disturb it if I don't have to. As for the 5" diameter I thought who needs a 7". In hindsight the 7" is better because the cubees are easier to pour into a 7" opening and less messy as I spill / splash some because of the 5" opening. I plan on changing the 25 micron to a 15 micron because my oil is only used once so I think a 15 would be OK and extend the life of the Goldenrod.
The plan is to wait until the 1st drum is full and move it's contents 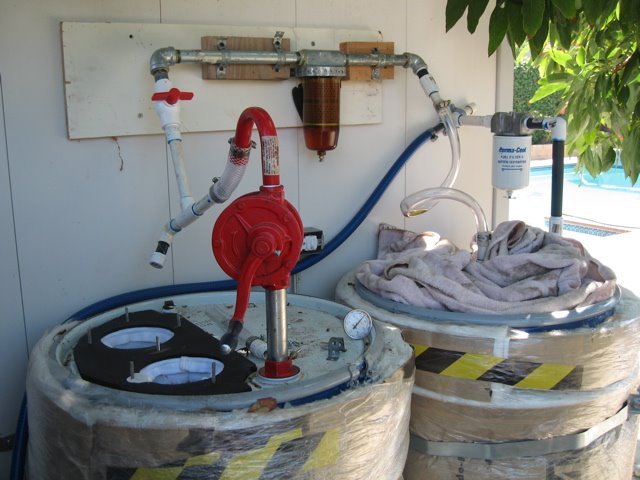 to the 2nd drum. This way I'm only heating the oil in the first tank once. So a day or 3 before I wish to transfer the contents from the 1 st tank I turn on the heater. This promotes dewatering and reduces the viscocity. The Harbor Freight pump is used to push the warm oil through a 10 micron GoldenRod filter which goes down through a clear piece of tubing (easier to work with and I can see the clarity of the oil) into a 5 micron sock. From there I just need to heat it for a few days to dewater it
The final stage is a 2 micron PermaCool filter that the oil passes through on it's way to my car via way of a Northern Tool 12v diesel pump. I try and fill up the tank while the oil is still warm in the 2nd tank as not to tax the pump more then I have too. I plan on heating the oil for a day or so before each fill up to warm it during the winter months.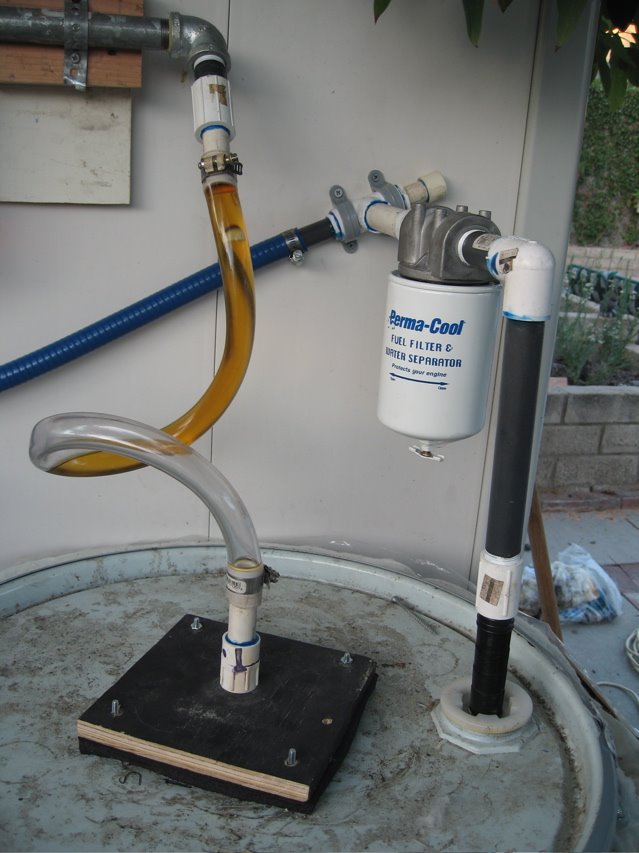
BUDGET
- 2 - 30' pipe heater $75
- 2 - 55 gallon drums $20 each
- Harbor freight hand pump - $40
- Northern tool pump - $150
- Golden rod $3o
- Permacool filter - $50
- Insulation - $15
- Earthquake Straps - $20
- Misc pipes / tubing / PVC - $30
VIDEO:

